Pizza Box Track Planning -- Rick Mills
July 28, 2018
This article describes a classic method of track planning, which allows you go from an idea directly to laying track - bypassing the scale drawing stage entirely. This is the method I used on my layout. It still works fine, and plus you get a pizza (or two) to eat!
PREPARATION
This assumes you have your benchwork ready. Having a rough sketch is helpful to begin, but is not required. You can design on the fly as you go along.
You will need one turnout of each size you plan to use (#4, #6, etc). Either left-hand or right-hand is fine. If you don't have turnouts in hand, many manufacturers offer actual-size image downloads from their web site.
Place a turnout in a photocopier and make a bunch of copies of it. If you only have a left or right, flip it over and copy the other side to make the mirror image turnouts. Cut out the images.The only critical part here is to cut exactly on the track ends.
Obtain a large pizza. Eat (or discard) the pizza, and save the box lid. (Any large flat piece of cardboard may be substituted). This will become your template.
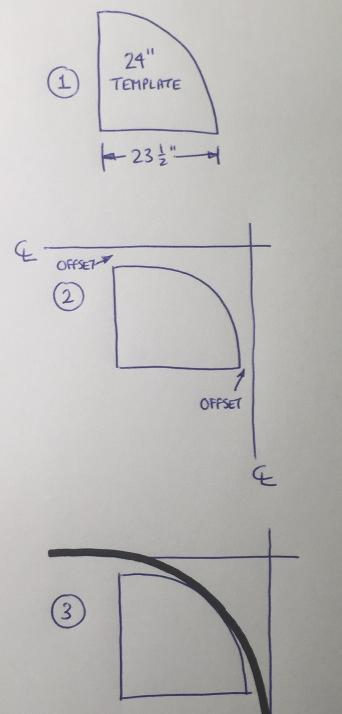
Make the template by drawing a quarter-circle on the cardboard of your desired minimum radius curve. Track radii are measured to the track centerline. For HO, subtract 1/2" since we will measuring to the inside of the track. See figure 1. If you want a 24" curve, make the cardboard's radius 23.5". For my HO layout, I used two: a 20" radius for industrial trackage, and 24" for everything else. Cut out the templates.
EXPERIMENTATION
Now we begin. Place the turnout copies on the layout, approximately where desired. Try "connecting" them using flex track. When you have a curve, use the template as a feeler gauge on the inside of the curve. If the track encroaches on the template, your curve is too tight. Adjust location of your turnouts so any curves fall outside your templates.
EASEMENTS
Easements are used to gradually enter a curve, both on the prototype and models. Easements improves reliability and avoid the tinplate-train-suddenly-lurching-into-a-curve effect. For a full discussion of creating easements, refer to the NMRA Data Sheet at . Here is a quick-and-dirty method of creating a certain radius curve with easements:
Extend the lines of the two tangent (straight) tracks on either side of your proposed curve, until the lines cross. See Figure 2.
Place the template inside the intersection, but space it out a bit (offset) from each line. An offset between 1" and 2" works well for HO.
Place the flextrack tight to the center portion of the template, and allow the ends to join the straight track naturally. A flexible yardstick on edge can also be used. See Figure 3.
Draw a pencil line along your desired track line.
TRACK LAYING
To make an adhesive that is flexible and repositionable, use white latex caulk. Squirt some into a container. Tint it by adding earth tone acrylic paint (so it won't be obvious if it shows between the ties) and mix. Apply sparingly to the track centerline using a putty knife. Press turnouts in place, and connect using flex track along the lines drawn earlier. Curved track may need some track nails or pins to keep it from springing back. You will be able to reposition track as needed for a few hours before the caulk dries.
Once you are happy with it, secure with some track nails.
Removal, if needed, can be done by prying a putty knife under the track and popping it off the caulking.
If you need assistance disposing of additional pizza, give any of your Seacoast Division buddies a call.